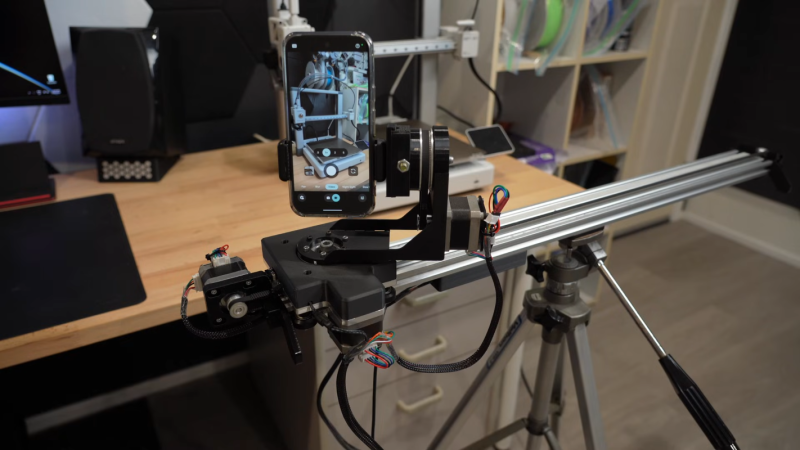
Building a Three-Axis Camera Slider with Repurposed 3D Printer Components
Have you ever looked at your 3D printer and thought its sturdy aluminum rails and modular parts could be used for something else? [CNCDan] did exactly that, transforming spare 3D printer components into a fully functional three-axis camera slider. This clever build not only saves money but also leverages the precision and strength of printer parts. Below, we dive into the details of his project, from the initial challenges to the final wireless control system.
1. Why Use 3D Printer Parts for a Camera Slider?
3D printers are constructed using extruded aluminum rails and commodity off-the-shelf components, chosen for their ease of assembly, prototyping, and remarkable strength. These parts are highly modular, allowing them to be repurposed for other projects like this camera slider. The rigidity of aluminum extrusions ensures smooth motion, while the modular design makes it simple to add axes and modify the setup. [CNCDan] already had these parts on hand from printer builds, so using them was cost-effective and practical. Additionally, the precision of printer mechanics—such as belts and bearings—translates well to camera movement, where fluidity and control are critical.

2. What Was the First Major Challenge with the Motors?
Initially, the motors were underpowered for moving the camera smoothly. To solve this, [CNCDan] improved the gear ratios, which provided more torque at the cost of speed. However, altering the gear ratios changed the physical dimensions of the drive system. This required him to redesign other parts of the carrier, including the mounting plate. The new plate had to accommodate different sizes and clearances, so he cut a fresh plate from steel and pressed bearings into it. This adjustment ensured that the motors could handle the weight without straining, setting the stage for smoother operation.
3. How Did the Steel Mounting Plate and Bearings Contribute?
After modifying the gear ratios, the original mounting plate no longer fit properly. [CNCDan] fabricated a new plate from steel, which offered greater durability and precision than the original. He then pressed bearings into the plate to reduce friction and ensure stable movement. This upgrade was crucial because the previous setup had clearance issues that could cause binding or wobble. The steel plate also provided a solid foundation for the other axes, including a quick-release mechanism for the camera. By using pressed bearings, he eliminated play and achieved the smooth, accurate motion required for quality video shots.
4. How Did He Deal with the Camera Weight and Smooth Motion?
The camera [CNCDan] used weighs approximately 1.4 kg, which presents a significant challenge for any slider—especially one built from printer parts. Getting the motors to move such a load smoothly required extensive software tuning. He spent several weeks rewriting all of his driver code, optimizing acceleration profiles, and adjusting microstepping settings. The improvements addressed jerk and vibration, which are common issues with heavier cameras. He also ensured the gear ratios (already improved) provided enough torque without sacrificing speed. Ultimately, the code updates made the motion fluid, allowing for professional-looking pan, tilt, and dolly shots.
5. What Role Does the ESP32 and Wireless GUI Play?
The entire slider is controlled by an ESP32 microcontroller, which handles motor commands and communication. [CNCDan] developed a graphical user interface (GUI) that runs on a separate computer, allowing wireless control over Wi-Fi. This setup gives him the freedom to adjust slider movements in real time without being tethered to the device. The GUI likely includes sliders for axis positions, speed settings, and recording paths. Since the ESP32 is low-cost and highly capable, it’s an excellent choice for this project. The wireless feature is especially handy for filming remote or hard-to-reach subjects.
6. Can the Slider Support Other Cameras or Smartphones?
Yes, [CNCDan] designed the slider to be versatile. While his main camera is a heavier 1.4 kg model, the slider can accommodate lighter devices such as smartphones. The quick-release mechanism allows for easy swapping between cameras. The software also likely includes calibration options for different weights to maintain smooth motion. This flexibility makes the slider useful for various projects, from professional video to casual smartphone footage. By using adjustable parameters, users can dial in the perfect movement regardless of the payload.
7. Where Can I Find the Build Files and More Details?
All project files—including CAD models, circuit diagrams, and code—are available on [CNCDan]’s GitHub page. He encourages others to replicate or improve the design. The documentation covers the entire build process, from hardware assembly to software configuration. Additionally, for more inspiration, check out examples of high-speed camera sliders that use similar concepts. [CNCDan] admits this wasn’t the easiest way to build a camera slider, but because he had the parts and tools on hand, it worked perfectly for him. For anyone with spare 3D printer parts, this project offers a rewarding way to create a professional-grade motion control system.
Related Discussions