Unlocking the Hidden Potentials of Your Samsung TV: A Step-by-Step Guide to the Secret Service Menu
Overview
If you own a Samsung TV, you already know it’s packed with features like smart hub, ambient mode, and gaming enhancements. But beneath the polished user interface lies a powerful hidden tool: the Service Menu (often called the secret menu). This diagnostic and configuration layer isn’t intended for everyday use, but it can unlock capabilities that genuinely enhance your viewing experience. In this guide, you’ll learn how to access the Service Menu and use five specific functions that solve common frustrations—turning off forced ads, checking your panel type, adjusting picture settings beyond standard limits, running hardware diagnostics, and even changing the region for app availability. We’ll walk through each step with clear instructions and cautionary notes so you can safely explore these hidden tools.

Prerequisites
What You’ll Need
- A Samsung TV (2016 or newer models recommended; older Tizen-based sets also work with slight remote variations)
- The original remote control (or a universal remote that supports the required button sequences)
- A few minutes of uninterrupted time
- Warning: The Service Menu is powerful. Changing the wrong setting can affect your TV’s performance or even require a factory reset. Follow instructions exactly.
Understanding the Risk
This tutorial is for informational purposes. Modifying service menu settings may void your warranty. If you proceed, note the original values before making changes. This guide focuses only on five safe, useful adjustments.
Step-by-Step Instructions
1. Accessing the Service Menu
The door to all hidden features is the Service Menu itself. To enter it, you need to use the remote control in a specific sequence:
- Turn on your TV and make sure no menu is open.
- Press the Mute button once.
- Press the 1 button once.
- Press the 2 button once.
- Press the 3 button once.
- Press the 4 button once.
- Press the Enter or OK button once.
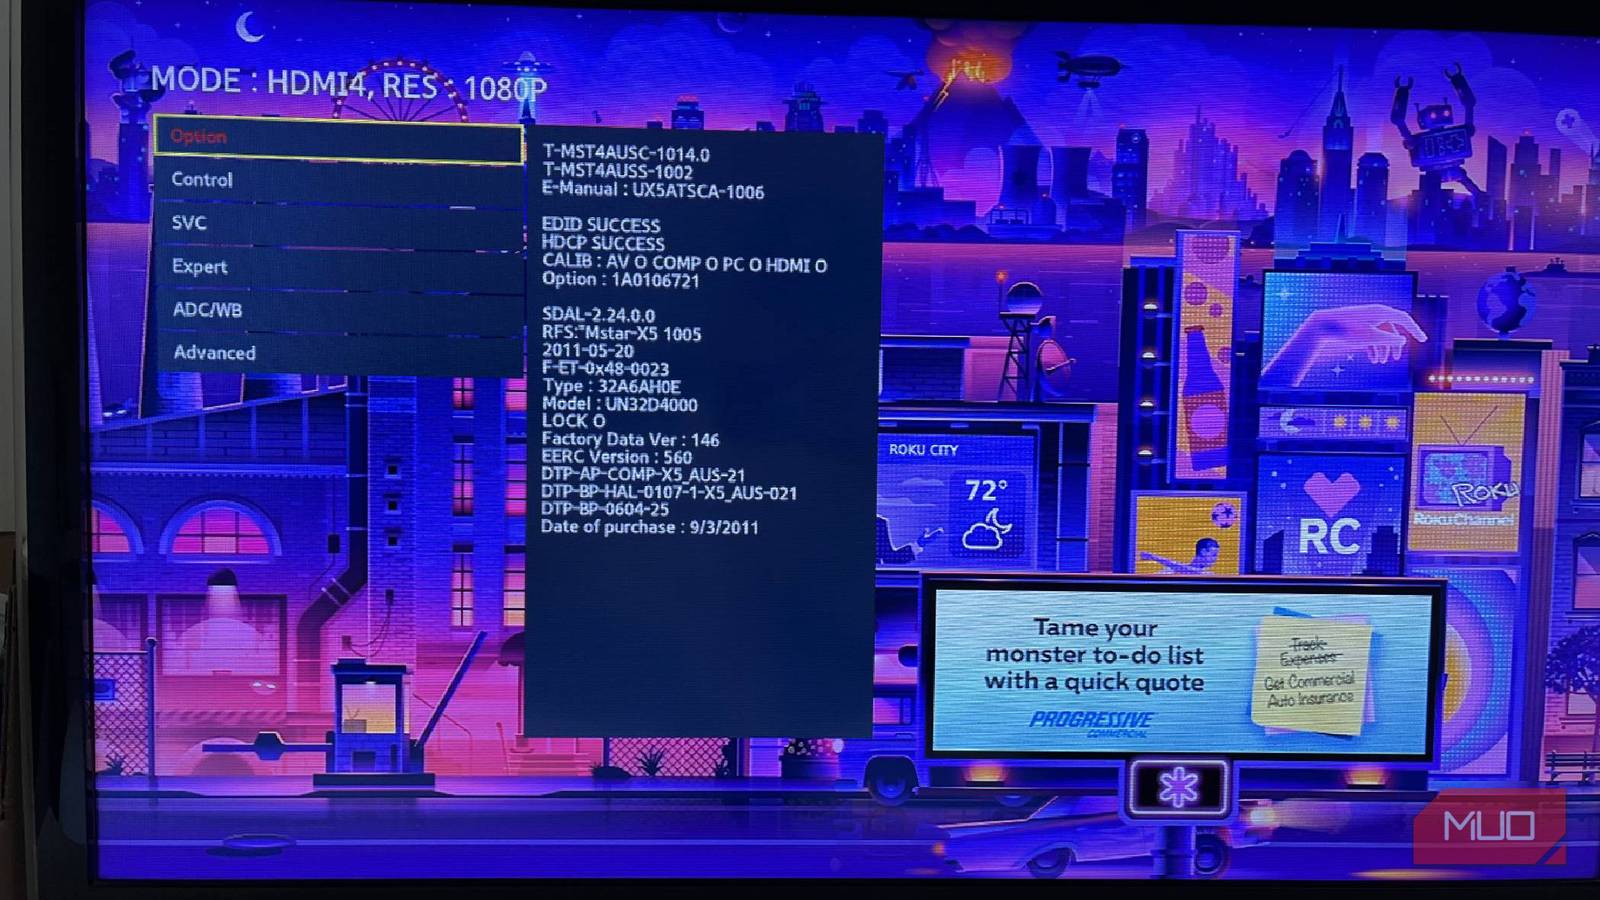
If done correctly, a blue service menu will appear. On some older models, you may need to replace step 6 with the Power button to exit. Once inside, you’ll see several rows of numbers and options. Navigate using the arrow keys, select with Enter, and go back with Return or Exit.
2. Disable Smart Hub Ads
Smart Hub’s ad banners can be intrusive. The service menu lets you toggle them off:
- In the Service Menu, go to Control > Sub Option.
- Look for Smart Hub > Ads / Recommendations (or similar).
- Change the value from
EnabledtoDisabled. - Exit the Service Menu and reboot the TV. Ads should no longer appear.
Note: Some firmware updates may re-enable this setting. You can repeat this step each time you update.
3. Check Panel Type and Manufacturer
Knowing the exact panel (VA, IPS, or even OLED on newer models) helps you optimize picture settings and understand limitations:
- In the Service Menu, navigate to ADC / WB or Panel.
- Select Panel Info.
- You’ll see details like Panel Type, Manufacturer (e.g., Samsung Display or BOE), and Resolution.
- Use this information to search for professional calibration guides specific to your panel.
4. Unlock Hidden Picture Settings (White Balance and Color Gamut)
The standard user menu limits color fine-tuning. The service menu reveals pro-level adjustments:
- Go to Control > Calibration or White Balance.
- You can now adjust 10-point or even 20-point white balance, as well as CMS (Color Management System) for each primary and secondary color.
- Make small changes (e.g., adjust R-Gain by ±2) and test with a calibration disc or built-in patterns.
- Caution: Write down the default values (often displayed as hex or decimal). You can restore them if colors become unnatural.
5. Run Built-In Self-Diagnostics
Is your TV showing odd artifacts or not turning on properly? Use the service menu to run hardware tests:
- Navigate to Self Diagnosis or Test Pattern (exact name depends on model).
- Select All White Screen to check for dead pixels or backlight uniformity.
- Select Color Bars to verify color accuracy.
- Run Memory Test or Audio Test if you suspect component failure.
- Results are shown quickly. If tests fail, note the error code for support.
6. [Bonus] Change Region for App Store
Some Samsung app stores restrict content by region. You can change the region code to access apps from another country:
- In the Service Menu, find Option > Local Set or Region.
- Select a different country code (e.g., from
USAtoKORfor Korean apps). - Exit and restart. The apps store will now show content for that region.
- Important: Changing region may disable certain local services (like live TV channel lists). You can always revert.
Common Mistakes
Getting Locked Out of the Service Menu
If you enter a wrong sequence or press buttons too slowly, the TV may ignore it. Simply try again from step 1 after waiting a few seconds.
Changing the Wrong Option
Many settings in the service menu are cryptic (e.g., EDID, Option Byte 0x1F). Never tweak options you don’t understand. Stick to the five categories mentioned above.
Forgetting to Save or Reboot
Some changes take effect only after a full power cycle (unplug for 30 seconds). If an adjustment doesn’t stick, try rebooting.
Accidentally Factory Resetting
There is a Factory Reset option inside the service menu. Do not select it unless you’re ready to lose all settings and sign-in data. It will not fix the issues described here.
Summary
The Samsung TV Service Menu is a powerful hidden interface that lets you take control of your device beyond what the standard menus allow. By following this guide, you’ve learned how to access the menu, disable intrusive ads, identify your panel type, access advanced picture calibration, run self-diagnostics, and change the region for expanded app stores. Always proceed with caution, note original values, and avoid unfamiliar options. With these five tools, you can truly tailor your Samsung TV experience.
Related Discussions